Over the weekend, I managed to get some paint onto some figures! It may not sound like much of an acievement (and the grand scale of things, it really isn't ...), but I'm pleased, as I can't really remember the last time I painted anything ... :( I've got pics below of what I've painted, and the cars I got from eBay that I mentioned in my last post; however, I've just added a desk lamp which seems to have made the photos to bright :( I suppose it makes a change from too dark though!
Anyway, last week I'd managed to base up all the 6mm figures I'd got from Irregular to use with ATZ-Mass Hysteria, and you can see them in the group pic to the right. Humans in ATZ-MH come in 3 types, Military, Police or Civilians and in the pic, the Military bases are in the green rectangle, Police in the blue, and civvies in the red. As you might be abble to make out, there are 2 types of Military bases: 'normal' and 'support' (the smaller ones at the top).

To the left is a close-up of one of the painted 'normal' military bases. Flesh for hands & faces, leaf green for uniform, umber for boots and dark grey for weapons is the extent of colours used. With 6mil's the key is to paint in blobs and remember they'll be seen at arm's length!
Here is one of the Police bases. Again a very simple scheme. As this photo and the one before show, I've gone with 4 figures per base for the Military and Police, but five for civilians - none of them painted so no pics! I've not got any zed bases done yet - figures not arrived! - but when I do them, I'll stick as many on as I can manage for a real horde effect ...
So, as all the military bases were done, I dipped them using Army Painter magic dip, strong tone. This really gives the mini's a great finish, although the pics don't do it justice I'm afraid ... to the left is a normal base
Here is one of the two types of support base I've done - this is a GPMG
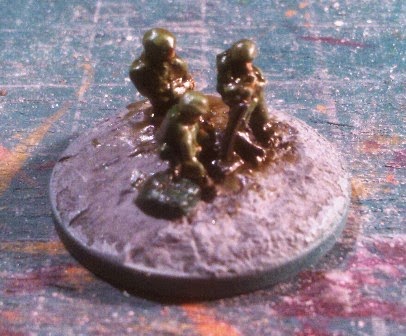
And here is the second type of support base - a mortar team. In
Grekwood mini's accesory sale (thanks Carl!) I got some
Extra fine ballast that I'm going to use to finish the bases
I trawled back through my photos and found this picture to the right that shows more clearly how the dip finishes the 6mil figs - in this case a Baccus WSS infantry strip (the sames as recently seen in
this post on Clint's blog); for before and after dipping pics see this post:
army-painter-quick-shade-aka-magic-dipOn to the cars I purchased from eBay. For the princely sum of £6.17 (with free p&p) I got the bag of painted model cars that you see to the left. Allegedly it contains 100 painted cars, but I haven't counted them ;)
The
ebay item description (hope the link works!) describes them as 'N/Z 1:200' scale, but as you can see in the pic to the right they fit almost perfectly with the (supposedly!) 1/300th figures from Irregular - at least IMHO!
And they also seem to fit with the 1/300th vehicles that I got from Irregular at the same time, which are (l-r in pic) a fire engine
(which seems very small to me!), Transit Van and Saxon APC
Apart from use as board clutter/decoration, I intend to use them to make the barricades that ATZ-MH allows you to make to slow the onrushing zed horde, and the pic to the right shows a quick mock-up of how that might appear; not entirely sure at present how I'll do it though ...
That's it for this post; next time I'll show the city-scape I've made for the game, and hopefully some more of the figures painted