As I have mentioned in other posts, I had originally intended to use Two Hour Wargames' Nuts! rules, with the War Against Japan add-on. but I was unable to summon up the motivation to re-read the - to my mind - complicated rules that surround the reaction system that is at the core of all THW's rules.
Don't misunderstand though; I have read WAJ and it contains some fantastic ideas and I do want to play them. but I think I should play some solo games first to get the mechanisms down pat.
Anyway, I had heard good things about the simplicity and fun of Too Fat Lardies' "I Ain't Been Shot Mum!" WW2 rules, but to be honest, I had previously been put off by the title. Those of you unlucky enough to live in a place other than Britain, may not realise that this is a play on words on the title of a BBC situation comedy from the 70s called It Ain't Half Hot Mum set in WW2 India.This had led me to believe, erroneously as it transpires, that the rules were comedic in some way.
Then I read an interview with the authors in Wargames, Soldiers and Strategy issue 58 about version 3 of IABSM which convinced me to give the rules a try - so I duly bought them as a pdf.
And - I feel constrained to relate - that I'm very glad that I did. They are not comedic in nature at all, but are a fun, perplexing and more involved than they seem at first glance set of rules.
At the first read-through, the turn-of-a-card activation sequence and the roll dice for movement system, both put me off, but I resolved to at least try them, and they work much better than I had feared. I've been against rolling dice for movement for a long time, believing that it slows down the speed of play un-necessarily, but the uncertainty of knowing whether your units will get to where you want them to be is really quite fun! And the unpredictability of the cards - especially when the pack includes a 'tea-break' end of turn card - is another plus point I had not expected.
These, combined with the 'fog-of-war' simulator that is the 'blinds' (a piece of card to represent as yet unspotted troops), produced a more fun and enjoyable WW2 wargame than it has been my experience with other sets of rules, and that is without mentioning one of the main parts of the rules - the 'Big Men'.
I have played Command Decision 3 quite a few times, and some other WW2 rules and would categorically state that IABSM beats them all for an enjoyable wargame (I make no statement regarding the rules' position on the simulation/playability axis and add the caveat that we only had 2 platoons a side for what is a 'company-level' game).
I think the best place to leave this mini-review of IABSM is to state that both Tim and I are looking forward to playing them again and adding in bits that we left out of our initial 'test' game - i.e. indirect fire, vehicles (both land and air), etc.
Showing posts with label 15mm. Show all posts
Showing posts with label 15mm. Show all posts
Thursday, 2 February 2012
Tuesday, 24 January 2012
15mm WW2 Burma; Part 4 Batrep
I finally managed to play a game last Friday evening, at my local club - Farnborough Wargames Society. I had originally intended to play with Two Hour Wargames' War Against Japan supplement for their Nuts! WW2 rules, but for some reason - that I still don't understand! - I just could not bring myself to re-read them in preparation for this game. Having heard nothing but good things about them, I decided to get Too Fat Lardies' I Ain't Been Shot Mum (IABSM) rules as a substitute and, I feel compelled to say, I'm really glad that I did! But more on the rules in Part 5 of this series.
So, the game itself. As it was our first time using the rules, we went for a simple scenario; I declared, with the full agreement of my opponent, Tim Cull (the ever-reliable newsletter editor for our club) that our game would represent an early 1943 encounter between a force of Japanese attempting to put a road-block behind a Commonwealth force that was on a road off table, and a British force sent to prevent them. Both forces would consist of infantry only, with one platoon entering the table at game start and the other appearing as a 'blind' once the enemy had been spotted.
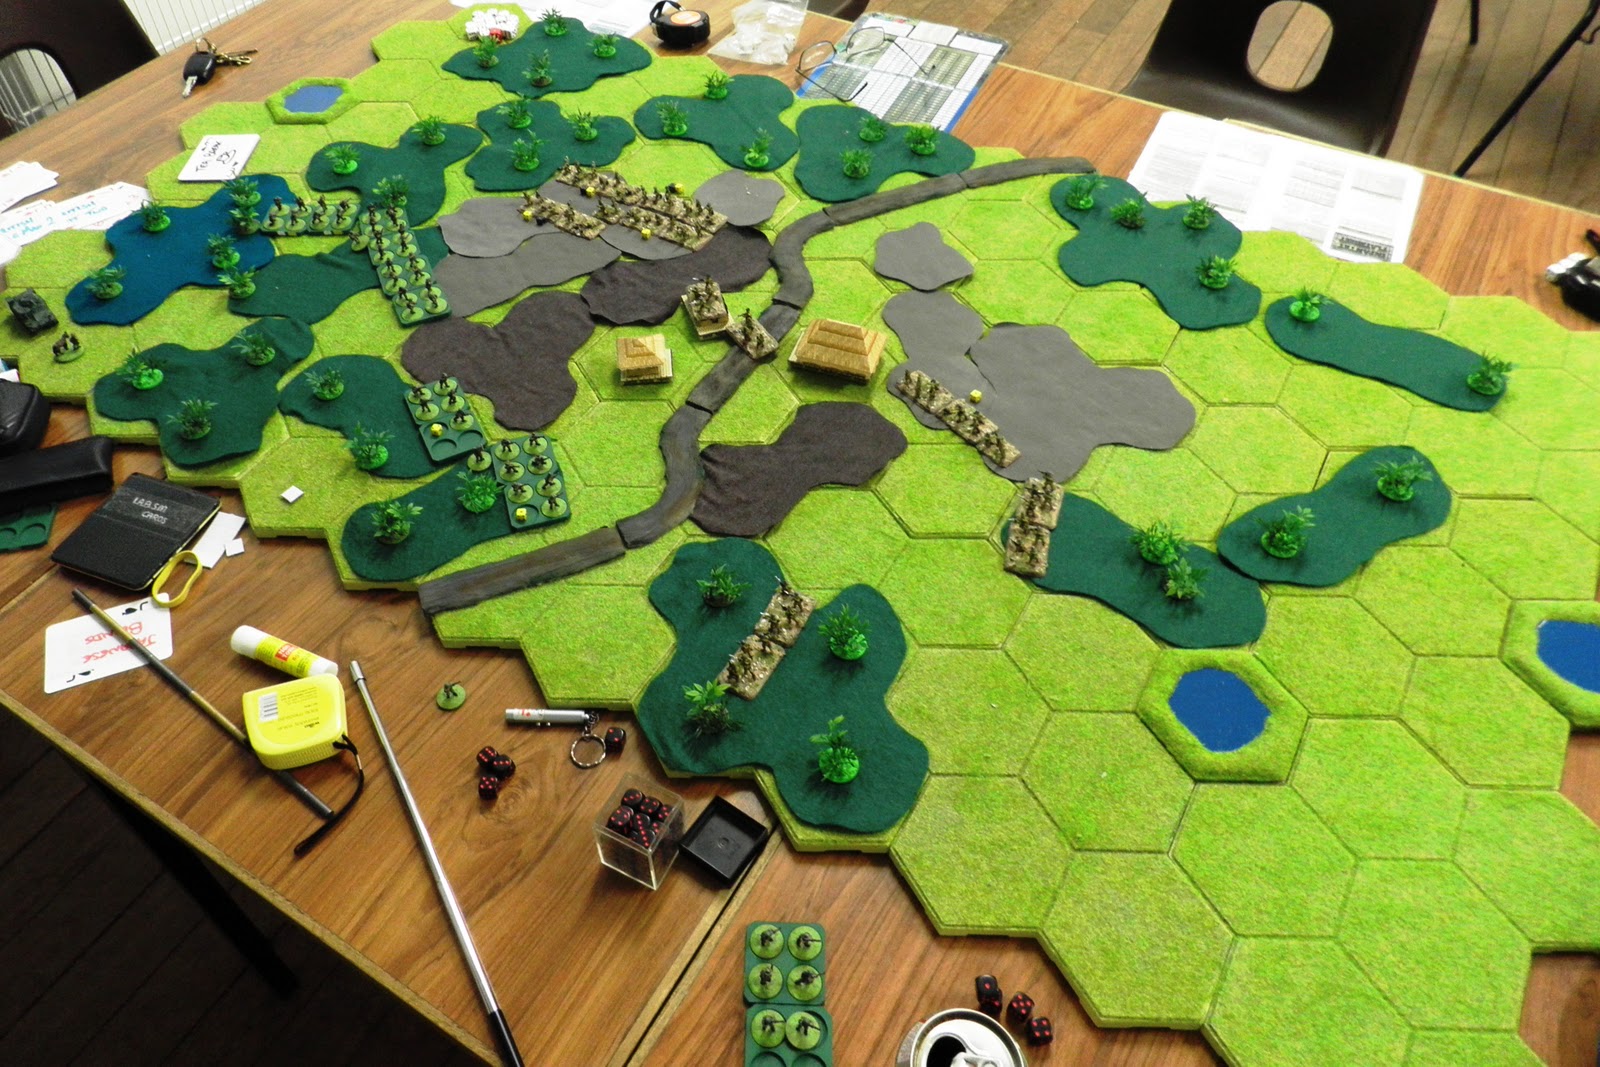
So, in the photo of the table below; the first Japanese platoon came on table on the top edge between the road and the right hand edge, while the British entered on the bottom edge from the road leftwards:

Unfortunately, this picture was taken quite a way through the game - the ones I took earlier had the exposure settings that I use at home, which under the strip lights in the community centre, resulted in some god-awful, over exposed useless piccies ... oh well, I'll know better for next time!
Anyway, unknown to me until I arranged the game, Tim has a large force of WW2 Japanese based for Flames of War, but hadn't used them as apparently there is no FoW supplement detailing the Japanese, so he was eager to use them in this game. Here's a close-up of some of them:

The game itself went well for the Japanese and badly for the British ... :( I could blame IABSM's card based activation and dicing for movement and then claim bad luck on the movement dice, but basically I wasn't aggressive enough. The picture following shows how I didn't seize the centre ground around the village fast enough, allowing Tim's Japanese to get there and establish a firing line and send a section on sweep around my right flank (seen in the patch of jungle at the bottom edge of the table). Consequently, I had my lead section ravaged by fire. It fell back to the edge of the jungle, joining another section there.
Then the Japanese 'blind' platoon was deployed and immediately charged my section that had been on my left flank, completely destroying it. My 'blind' platoon deployed and gave some rough handling to the newly arrived Japanese in revenge, but it had clearly become a holding action for the British, and not a very successful one at that ...
There are some more pictures though. This shows a view from the southern edge of the village and clearly shows the bases I was using to group my singly-based Brits

Another view here; this time my 'blind' platoon just after deployment with the 2nd Japanese platoon firmly in their sights ...

A fun game and thanks to Tim Cull for making it so!
Monday, 9 January 2012
15mm WW2 Burma; Part 3 Terrain
And onto part 3 of the Burma series, the terrain I'm going to use. My intention is to use my hexon 'boards' as the base and onto that I'm going to put patches of different coloured material to represent different 'types of terrain. I bought the boards in their black unflocked incarnation as that was cheaper than buying them ready flocked, but if I were to do it again, I'd certainly get them ready flocked as painting them and flocking them myself has been a real pain.
Anyway, there are 2 additional things that I'm going to use - card grass shacks from paperterrain.com and some jungle 'markers that I've created myself.
Starting with a group shot of the features I've just mentioned, here are all the grass shacks and the jungle markers I've made, shown on the tray that's their home. There are a dozen shacks and just over 50 jungle markers:
The grass shacks I got for my Vietnam miniatures which are 10mm figures, so that's the scale I purchased. However, I think they are close enough to use with my 15mm Burma mini's as you can see in the following piccies. Paperterrain are not a print and build supplier as are most card building retailers - in my experience that is. Instead they print the models onto card and ship them to you. I was worried about them getting folded in transit, but nothing occurred with my delivery. I guess it might depend how well you know your postie though - mine's an old neighbour, so he seems to follow instructions like 'do not bend' (unlike some posties I've had in the past ...)
Anyway, the buildings sold by paperterrain have an exterior shell that can be lifted off to show a 'ruined' version underneath. This first photo shows the smallest grass shack; its lift-off exterior on the base (hiding the ruined version) on the left, the 'ruin' in the centre and the shell without the base on the right
The black edge around the top of the ruin was added by me with a felt tip, to show it had been partially burnt. I like it, but YMMV. In the pack I got there are 6 of the smallest size shacks, 3 mediums:
and 3 large shacks:
As you can see the shacks had no colouring on the inside of the ruined version (since taking the photos I've painted the inside though) but, they have a bamboo pattern floor, as you can see in this higher angle photo:
I like these models. They were easy enough to assemble and the card they're printed on is not heavy duty, but certainly adequate. I used foamboard inside the bases of the shacks - I can't remember if that was on the instructions or not - as the bases were the right height for it! The only real issue is that where the base section had to be folded the printing wore off, but that was easily touched up with felt-tips and I've had the same problem with buildings I've printed myself - a hazard of the medium I guess.
Onto the jungle 'markers'. These are made from Products for Wargamers' "Jungle Plant 2" and "Jungle Plant 3", although they have been chopped about quite a bit. Here are 3 of them next to 3 of my Brits as a size indicator:
I had hoped that they would be quite effective to symbolise jungle areas on the board. Here is a close up of 2 of them with one Brit:

However ... I'm really not sure now ...
Anyway, there are 2 additional things that I'm going to use - card grass shacks from paperterrain.com and some jungle 'markers that I've created myself.
Starting with a group shot of the features I've just mentioned, here are all the grass shacks and the jungle markers I've made, shown on the tray that's their home. There are a dozen shacks and just over 50 jungle markers:
 |
| Shacks and markers on their storage tray |
Anyway, the buildings sold by paperterrain have an exterior shell that can be lifted off to show a 'ruined' version underneath. This first photo shows the smallest grass shack; its lift-off exterior on the base (hiding the ruined version) on the left, the 'ruin' in the centre and the shell without the base on the right
 |
| 10mm smallest grass shack with 15mm figures |
 |
| 10mm medium shack with 15mm figures |
 |
| 10mm largest shack with 15mm figures |
 |
| Bamboo floor inside shack |
Onto the jungle 'markers'. These are made from Products for Wargamers' "Jungle Plant 2" and "Jungle Plant 3", although they have been chopped about quite a bit. Here are 3 of them next to 3 of my Brits as a size indicator:
 |
| Jungle markers next to Brits |

However ... I'm really not sure now ...
15mm WW2 Burma; Part 2 The Japanese
Well here we go with part 2, the Japanese. These are also from Peter Pig, but whereas I bought the British as packs of figures, I got the Japanese as one of their platoon packs. They do 2 different platoon packs, one in cap and one in helmet and I opted for the cap version.
Getting this pack did mean that a) I got the correct number of figures for a platoon, b) it was slightly discounted (I think, I've not actually costed it out), but there is little variation in the figures. That is, if I'd bought the individual packs of figures I could've mixed them up with helmetted figures.
Anyway, on to the pcitures. Again, first up is a group shot of all the Japanese, including the casualties that were unpainted at the time, but I've since painted
 |
| Group shot of all the Japanese |
The first group includes the support weapons; the ligh machine gun team and the so-called 'knee mortar'. From what i've read though it seems to be more of a 'grenade-thrower' than a mortar. The LMG team has a very interesting quirk, I thought; the LMG has a bayonet attached, which is, IMO, a very telling point about Japanese tactics in WW2.
 |
| Platoon support weapons |
Next is a photo of the 3 infantry poses that exist in the platoon pack. As I said above, by getting the 'cap' platoon it restricted the poses to these three. Consequently, there are 8 of each of these poses!
 |
| Riflemen poses |
 |
| Command group |
Finally, the 3 poses in the Japanese caualties pack. I intend to get another couple (at least) packs of these, so that when the wave attacks come in, the British players will get a feeling of the pressure that they have been under, rather than just removing casualties and having an empty battlefield
 |
| Casualty poses |
I've just been looking at Bayonet Strength's pages on Japanese organisation and I think that the platoon is under-strength ... so may need some more minis. I'll keep you all upto date on developments.
Thursday, 5 January 2012
15mm WW2 Burma; Part 1 The British
So ... here is the first post in the series on my Burma game. All the infantry miniatures that I'll be using are made by Peter Pig, while the tanks are from Skytrex. I've painted most of the figures I have, the excpetions being the figures I picked up from Warfare at Reading in November.
The first pic is a group shot of all the British that I have, including the unpainted and some pennies that represent the gaps in the 2 platoons that I'm planning to represent. I've based my units on the very, very, useful organisation details that can be found at the Bayonet Strength website (link on the right of this page), specifically the British Infantry Battalion 1943 to 45. That said, I have made the platoons understrength as they probably would have been in the field, having 8 instead of 10 men in each of the sections and only 2 instead of 3 in the light mortar team. Here they are:

In the following pic's I've grouped the miniatures by the packs that you get them in and included front and back or side and side shots of each pose, and each photo is captioned with the pack name - which can then be found on this Peter Pig page in the 14th Army table.
 |
| 14th Army Rifles Advancing |
One thing I like about these 14th Army figures is the mix of steel hats and soft hats on the figures; it gives a good feel of variation. I'll probably get another pack of the advancing rifles to fill the gaps in my sections as I currently have 2 packs of firing figures and one of advancing.
 |
| 14th Army Rifles Firing |
 |
| 14th Army Brens |
Next up is the command pack. This had 3 of the radio operator and the guy pointing wearing a steel hat and 2 of the guy in the soft hat; I'm using 'soft-hat' as Platoon officers (Lieutenants [Lef-tenants]) as they are carrying thompson SMGs, while the 'steelhats' will be platoon sergeants - well 2 of them; the third will command the mule section I think.
 |
| 14th Army Command |
 |
| 14th Army 3 Mules+3 men |
 |
| 14th Army 2” Mortars |
 |
| 14th Army Dead |
 |
| 14th Sten SMGs |
 |
| CD114 Grant Tank |
So that's the British force and next time it'll be the Japanese, a much shorter post as I'll explain when it appears.
Tuesday, 1 November 2011
Ironclad Village
First of the promised bunch of posts is a 15mm village I've constructed from buildings and fences from Ironclad Miniatures. These buildings are described as 'eastern front' which is how I'll use them - when my russkies and rumanians are painted - but I also intend to use them with my Splintered Light Minis 18mm fantasy. Accordingly in the pics I've included an 18mm fantasy figure and a 15mm Peter Pig Japanese rifleman.
So to start, a group shot of all the pieces with some 18mm figures as a size guide:
Then close-ups of 15-H1 Small Log House. I have two of these and very nice they are too. The only quibble is that - unlike the other buildings, these have a chimney, but no fireplace ... but that is a real pedant of a moan ...
Then we have 15-H5 Small Eastern Front House which is also available as 15-H6 with a different roof. This model comes with a seperate lean-to shed - a nice add-on that can be put next to the building on any side. Another fine model
Last of the buildings is 15-H4 Eastern Front House
And last of all are the fences, comprising 15-fen1, 15-fen2, 15-fen3 and 15-fen5
So to start, a group shot of all the pieces with some 18mm figures as a size guide:
 |
| The village on my table - all the other pics will have the model's dimensions |
Then close-ups of 15-H1 Small Log House. I have two of these and very nice they are too. The only quibble is that - unlike the other buildings, these have a chimney, but no fireplace ... but that is a real pedant of a moan ...
 |
| 76mm x 53mm x 53mm incl roof, 27mm w/out roof |
Next is 15-H3 Eastern Front Barn another nice building:
 |
| 105mm x 70mm x 55mm incl roof, 30mm w/out roof |
Then we have 15-H5 Small Eastern Front House which is also available as 15-H6 with a different roof. This model comes with a seperate lean-to shed - a nice add-on that can be put next to the building on any side. Another fine model
 |
| 69mm x 52mm x 57mm incl roof, 30mm w/out roof |
Last of the buildings is 15-H4 Eastern Front House
 |
| 75mm x 82mm x 59mm incl roof, 30mm w/out roof |
And last of all are the fences, comprising 15-fen1, 15-fen2, 15-fen3 and 15-fen5
 |
| long: 75x16x16mm; short 30x16x16mm; corner 35x35x16mm |
These are really nice models and the interior detailing is good. I especially like the windows. When I got them, there was a thin skin of resin in the gaps between the frames which I removed without too much trouble, although some of the frames didn't quite survive this ...
Anyway, I recommend these models to anyone gaming in these scales
Subscribe to:
Posts (Atom)