Showing posts with label Stoelzel. Show all posts

Thursday, 31 July 2014

even more buildings and 2 bridges

For once I've managed to keep to a target for posting!  Below you can see a group shot of the more recently constructed buildings that I'll be posting on.  This time though, I'll tell you what they are!
At the back is a World Works Games' Swift Scenics range Office Block, in the centre front is a Finger and Toe Models' Multi-Story [sic] Warehouse and that is flanked by two Stoelzel’s Structures The Cottage. Unfortunately, the last three do not have (yet!) finished roofs ...  As threatened, the BTD British section is deployed to the front.

I tried to get the pictures for the first building post as well last night, but was having real problems with lighting :(  As it was only bridges that I used for the test shots, I thought I'd post them anyway, so here they are - again with the infantry included
Both bridges in the pics were constructed from Dave Graffam Models' Covered Bridge. As with all DGM products, the 'layers' included in the files allow for a wide variety of finished models.
I think that I'll be making at least one more bridge from this set - a 1" wide wooden bridge with a stepped approach (as you see in the pics, both of these have ramps) to use as a footbridge.
I made both of these with 5mm foamcore, except for the ramp surfaces and vertical sides of the brick bridge which used 2mm mounting board.

The kit includes layers for cobblestone, wooden, medieval brick, victorian brick and stone bridges, but no tarmac surface. Also the only sides included are wooden, but I reckon you could make brick or stone sides from the bridge surface.  It's set up for 2" wide bridges, but again I think you can make wider bridges without much difficulty. In fact, I think I'll have a go at that myself at some point!

Finally for this post, thanks to all of you who've made such supportive comments on these recent posts - they are both very much appreciated and very helpful - thanks guys!

Friday, 22 February 2013

WIP - Stoelzel's Garage

As well as 2 fistfuls of cars (actually more than that, but I liked the sound of 'fisftfuls' :) ), Carl Stoelzel's - the evil mastermind behind Stoelzel's Structures - Auto Park Playset includes 3 buildings: a carwash, car dealership and a garage.

I've been putting together my version of the garage, but recently it went on hiatus while I started work on a SECRET PROJECT ...  but, as seems to happen with me, I got a bit bored with that last night and returned to the garage, and reached the point with it, that I can share some photos of it. I've not done any of the props for it as yet, and want to put a few more in it as well.  Anyway, here's the first pic which shows the building so far:
As you can see, I've yet to 'brand' it with any signage and have most of the exterior doors to do. This next pic shows the interior:
And finally the extension, which I've hacked about from the office of the carwash building. The garage as supplied has no extension. I've added it to house a toilet, customer waiting space and a sales desk of some sort
As usual, I'm a bit behind with the props ...

Tuesday, 19 February 2013

Spam comments, Gaming table solution and a MUCKy Car-park

First the bad news; I've been getting so many spam comments on this blog, that I've turned word verification back on ...

Moving on, I've been wondering what to do about a gaming table for a while now. My dining table - the only flat surface I have big enough to use (well apart from my bed or the floor, and there would probably be problems if I used those ...) is only 30" wide. So, I was in B&Q the other day, when a brainwave struck and I bought 2 packs of their loft boards, which were (IIRC) £6.98 for a pack of 3. These are made of chipboard and are 1' x 4', with tongue & groove edges so they slot together nicely. I bought 2 packs as I needed 4 (and they're in packs of 3 ... bleeding typical!), and have a bit of DIY for one of the spares and the last will probably be used for hills or something similar. Here is a pic of them on the table:
Loft-board gaming table
The omni-present problem of storage has been solved with the help of a no-longer required curtain and the handy fact that the table is up against the wall when not in use:
cunningly hidden loft boards ...
So having got my table solution, I thought I'd lay out the car park I've been working on from my latest purchase from  Stoelzel's Structures - Undeveloped Real Estate (URE). This contains a whole bunch of road, grass, sport courts, roundabout ground tiles, plus a wide variety of props and other stuff. As a first for Stoelzel's it's split into multiple bookmarked files - hoorah!! It's been frustrating trying to find (and then remember exactly where it is) individual sheets in earlier Sotelzel products, because of the massive variety of prints Carl supplies (as an example Historic District - Olde Towne is 461 (!) pages of building brilliance).

Anyway, enough whinging about how much you get for your money ...

Here is a shot showing the car-park tiles put together (with Stoelzel vehicles) along with my new MUCK (Stoelzel's Modular Urban Center Kit) building at the back, with the Food Market to the left, the Local Put to the right, and my version of the clinic on the far left:
a Stoelzel-heavy demo layout

Astute observers who own URE may well notice in the next picture that I've reversed the arrows on the car-park tiles to change the direction of travel around it. This makes it better for a British car park, as the tiles as they were supplied would have created a queue for it that went past the entrance.
close up of the arrow for the exit
 Also, in the next pic, you'll see a tile that I created from those in the URE; it is a British T-junction. However, in retrospect, I'm going to change it as I think it should be an entrance only, and I'll make a tile as exit only for the other side
t-junction exit
As a note on the tiles, I had problems with the foamboard being warped slightly. To get around this, I trialled out using cocktail sticks as connectors between them - i.e. you push it half into one tile and the other half into its neighbour. (This wasn't my idea; IIRC, I read a discussion I think between Zabadak and Vampifan somewhere.) This worked really well and although I didn't use it for these pics, I will use it when I game on them.

This next pic shows more of the MUCK building. I made it as an 'edge-filler' and as such it has no back, nor opening doors or proper windows. (ducks as Vampifan begins to get upset :) )
left side of the MUCK
 This is the right side of the pic, showing the sign that I'm going to replace due to its spelling mistook
'parlor''?!? come on!
 Something else about the tiles that I've changed is the pavements. The URE pavements come with a black tile pattern on them, which is too dark for my tastes. So, I copied the pattern from Grekwood Miniatures Residential Roads and with that created my own pattern. I then stuck these to 2mm mounting board to create raised pavements that you can see in the pic below. I'm very pleased with these and will be doing this for all my pavements.
pavement close-up
So there you have it; my progress on the URE car park (or parking lot as it's called in the file). I've not made any of the props supplied with it as yet - those will come eventually, but not soon, as I'm currently building the garage from the Stoelzel Auto Park Playset and working on a kit-bash derived from URE

By the way, if there's any interest I'll put a post on the Stoelzel forum about how I flipped the tiles and made my own.

Wednesday, 6 February 2013

Stoelzel's Structures Vehicles

As promised in my last post, this one will go into more detail about the vehicles I have been making from Stoelzel's Structures. As I said before, all but the RV are from the Auto Park Playset, and the RV is from Trailer Town Playset, both of which are excellent sets BTW.

Before I share pics of the models, I thought I'd share the process behind making them with you.  As I print my models on a colour laser printer, which AFAIK, will not print onto card (and I'm not able to do so, even if it could), the first stage of all my builds is to cut them out from the A4 sheet. 

Then I glue them onto thin card using a glue stick, before cutting them out (again) from the card sheet. Note that the tabs on the model should NOT be glued to the card. I've tried this, and while it does give stronger tabs, the card makes it very, very difficult to get a tight enough crease on the tab.

The next step is the bottom of the model. Back in my post ebbles-card-vehicles, I mentioned that I added a piece of 2mm thick card (aka mounting board) to the model to give it added weight and stability. With these models, I've evolved that a step further by adding a piece of foamcore on top of the piece of card. This doesn't noticeably add to the weight, but it does give the bottom edge of the sides something they can be stuck to as well as allowing you to squeeze them together as the glue takes hold. Also the tabs on the bottom edge of the sides can be glued to the card instead of trying to glue the bottom of the model onto tabs that you can't get to. The underside part of the model is then glued onto the card.

This method is especially easy with the Stoelzel's models as the underside is a seperate piece - thanks for that Carl!

And finally the wheels ... these have been a real pain. I developed a process for these when making the Ebbles models referred to earlier. What I do is to take the print of the wheel, cut off the piece that wraps around the wheel so you just have the tyre's side image and stick that to foamcore. I then cut this out with my knife - never yet having achieved a round cut-out - and then glue the bit that forms the outside edge of the tyre to the foamcore. All that remains is to edge it with black marker. I found the little triangles that are supposed to glue under the tyre's edge far too fiddly - they stuck to my fingers more often than the tyre :(

So that's how I make them, and now onto the pics of the models I've made so far. 

First is the estate

Then we have the Luton van. Although this looks very fiddly when printed, it was easier to put together than I had feared. These pics show quite clearly that I used the wrong shade of red when edging it :( I will have to find a darker shade.
 

Now the ... I'm not sure what it is actually; is it another estate? or a hearse? perhaps Carl can tell me. Whatever, it is a nice model, although you can clearly see that I have yet to edge it. This clearly shows on the bonnet edge in the second pic

The green sedan arrives next. As with all the models in the Auto Park Playset this comes in multiple colours and I can see that I'll be making quite a few of these

And the same with the next model - the SUV

And finally the RV. As you can see this is a big model.

What I found with the RV, and the body of the Luton is that the sides are long enough to bow inwards once assembled. This meant that I had to carefully slice the RV open and insert a brace (scrap foamcore) to keep the sides pushed out. Having discovered this with the RV, I braced the van as I was assembling it, obviating the need to cut it open. Even with the brace, the sides of the RV are still slightly concave as I hope you can see in the pic below where I rested a flat piece of foamcore on the side of the RV.
This 'concavity' doesn't really show in the finished model - you can't see it in the 2 pics of the RV above and they were taken after the opening & bracing, but the strange thing is, that you can really feel it when you pick the model up ...

Anyway, if you make these models - i.e. RV & Luton - then put a brace in.

I'm not sure if it comes across in this post, so I'll specifically state it here; I enjoyed making these models, and the "trial of my patience" that I mentioned in my last post  because of the steps I outlined above and not because of the models themselves!

Next time ... the car park


Friday, 1 February 2013

Zombie Blog, MDF Boards and Cardboard Vehicles

As you might have guessed from this post's title, I've got a few things to post about today ...

First is a zombie blog that I've just discovered as its author has joined the rather friendly forum - Board of the Living Lead, which I heartily recommend to all.

The first post of this blog / journal is at this link and I, for one, will be following it and trying to catch up!

Second. With the release of Stoelzel's Structures' Undeveloped Real Estate, I decided to use the roads in that pack to create some terrain boards.  So I surfed the net for a while looking for some thin MDF to use as the base.  I found Hobarts Lasers 3mm MDF and ordered a 15 of the 300x600 sheets to begin with. I had been planning to glue some of the 2mm mounting board that I use for buildings to the MDF to give it some texture, but when it arrived I decided to try just gluing the prints straight to the board.

Unfortunately, this was a mistook, as the boards warped :( . So now I've tried the card on the board and have left them under a weight to allow the glue to set with the boards compressed flat. I haven't removed the weights since Wednesday night and will check them tomorrow probably, so fingers crossed!

And finally, number 3. The card vehicles I've been making. All but one, IIRC, are from the Stoelzel's Structures' Auto Park Playset, the RV is from Stoelzel's Structures' Trailer Town Playset.

I had intended to take some decent photos of them last night, but time got away from me, so grabbed some quick photos this morning on the way out. So, here they are.

First up is a group shot, with (from left to right) the sedan, the not-ghostbuster hearse (?), station wagon estate, SUV, RV and luton van (not finished yet)

Next is a closer shot of the Sedan, with Zed-Me for size indication

A slightly blurry pic next

And finally, the rather big RV

It's been a trial of my patience putting these together, and I'll go into what I did in more detail in a future post

Friday, 19 October 2012

Stoelzel's Structures' Local Pub

After the tease in my last post, I thought I'd do a proper post on my latest build, Stoelzel's Structures' "The Local Pub. When I began this build, I wasn't too keen on the building, having several reservations about its layout, but as I've progressed, I've come to like it and, although the reservations are still there, I think that I will use it as my survivors' home when I begin my zedalypse campaign.  Anyway, on with the pics!


First up are the exterior shots. To the left you can see the pavement pieces that I made from the prints in the file. Also, you can see that I renamed the pub to a more patriotic 'The Crown' (as supplied the pub is named 'The Winch'). Apparently, 'The Crown' is the second most common pub name in England (after 'The Red Lion') and if you included all the derivatives (e.g. 'Three Crowns', 'Crown and Cushion', etc) it would be far the most popular, so I redubbed the pub. You can also see that I cut out all the windows in the building and 'glazed' them with clear plastic - mainly saved from blister packs. This is the first build I've made where I decided to glaze it before I'd stuck the walls together and it's much easier to cut the windows out then, I can tell you!

This exterior shot shows off the larger of the 2 pub signs I made. The picture was liberated from the interweb, glued to card and then stuck to a cocktail stick that I forced into the foamboard. I'm very pleased with both of them, although the ground level, smaller, sign is a bit too low. In all 3 exterior shots you can see the problem I've got with the roof - the foamboard I've used is bowed :(  This means that I can't get all the roof to sit neatly on the second floor - bum.
I have made enough pavement to surround the pub (honest!) but didn't use it all for the photos, so this final exterior shot has just the 2 pieces re-aligned. It is surprising just how much of a difference it makes. Anyway, this rear exterior shows where I've put the pub sign again. I'm thinking about putting a billboard on this wall as well. Just need to come up with a poster for it. You can also see the small back door in this pic, which is also glazed.
And the last of the exterior shots - the roof. I'm going to add an access hatch to this (once I've made it!) as it seems a waste to not have any way to get to it. As designed, the pub has solid vertical walls with 'lift-out' interior; I've previously said that I don't really like this, as when I put the Food Market together I found that the 'lift-out' design means you have to lean over to see the interior properly. So I made each floor of the pub a separate removable piece.
This is demonstrated by the pic to the left - the roof has been removed and you can see the interior of the second floor (third to you yankees). The doors in the walls are made using Vampifan's masking tape method, described here on the Stoelzel's forum (as well as somewhere on his blog no doubt!). I must admit to some scepticism on reading it, but it works a treat - thanks VtG!
Having removed that floor, we can now see the next, with Zed-Me on the stairs, the top of which can just be seen in the pic above. As I described in the post about the Food Market, I've not put anything (except the paper print) in the vertical risers of the stairs, so Zed-Me's base is trapped between the stairs' horizontal steps and held in place. This floor is also one of my reservations about the layout. I don't really like that you have to go through one room - the centre room - to reach another - the room on the left. Not sure what I'll do about this, but I suspect that at some point, I'll change the layout by adding a hallway of some sort ...
And removing the first floor we can see the bar itself. I've not made all the furniture supplied in the file, although you can see the juke-box, pool table, example bar stool and example chair. This area is the second and final of my layout reservations - the way that the stairs are placed into the room - very strange IMO. They should be against a wall I think and I might move them or add a wall ... at some point .... Just at the top centre of the picture you can see the edge of the toilets, which I've changed considerably from how they are supplied ...
The detail of my changes can be seen in this pic to the right. I've used walls from Stoelzels' hospital model as they seemed more fitting for a loo, and added a second toilet and sink as well as a hot air dryer on the wall (made by chopping the toilet cistern about).
The dividers and doors of the stalls were made from a piece in the WWG Mayhem Police set and I'm very pleased with how they came out. Again they're hinged with masking tape and do open and close. The bar across the top is another cocktail stick, coloured in with a permanent  marker.
This penultimate photo is an zombie-eye view of the bar's interior showing off some of the extras in the file - the dartboard, chalkboard for score and juke-box in particular.
And finally a shot of the bar itself with Zed-Me ready to serve - not that I'd take a drink from him!

Tuesday, 16 October 2012

The Pub - a tease ...

Well it's nearly done ... just got a few bits more to do and it will be. In the meantime, here's a couple of pics to show you parts of the Stoelzel's Structures Local Pub as I've made it:

a drive-by pic - that's why it's blurry, honest!

Zed-Me all alone in the bar

I took this with my phone, looking through one of the windows
at the LCD screen - v. pleased with how it came out!

With the Local Pub there are some pavement prints and I made one last night - I'm very pleased with it and will make more

Monday, 8 October 2012

Update and Something Ordered ...

I made some progress on my Stoelzel's Structures' Local Pub this weekend; all the windows are fully 'glazed' [what a goddamn pain that was! Carl - don't make windows that small again! grrr!  ;) ] and the next step is to do the doors. Once they are done, I'll be ready to assemble the building, and then there will be pictures - honest!

It's nice to see Ironmonk back posting over at his blog - Zed Storm Rising - and his latest post on card vehicles, reminded me of my mention in this post - quick-update on 24 July - about my intent to build a convoy of Ebbles Trucks. I can't remember how far I got with that, but as the drawer unit with them in is still at home and not in storage yet, I'll try and get some photos of what I did make done tonight.

Mantic Ghouls as Ragers ...
not so happy with them now :(
And finally for this update ... I've been 'umming and ahhing'  about whether to order this set from Mantic Games for several months now ... I wanted to get some more 'ragers' (for which I've used Mantic's ghouls) and wanted some zombies that wouldn't look out of place up against my Edwardian Sci-Fi stuff, and IIRC Brummie at Brummies Wargaming Blog, posted on the Mantic zombies saying they were good.  Plus the tombstone markers will help expand my small cemetary terrain piece.  So this morning I bit the bullet and placed the order. More on this when they arrive!

So the 60 undead in that set plus the Studio Miniatures plastic zombies from their kickstarter project that should arrive soon, will give me a plastic mountain to match my lead mountain!

Monday, 1 October 2012

Post 100! and it's a biggie!

Well, despite what I said in my last post - temporary-absence - I have been able to take some piccies to share with you all, and when I realised that this would be the 100th post on this blog, I thought that I'd better make it a big one!  So, below you will find pics of the progress I've made on my Stoelzel's Structures Food Market, what I've done on their Local Pub (not much!), the bits I have ready to build from their M.U.C.K., the first unrealistic attempt at their Storage Unit Building and pics of the hospital beds from Grekwood Mini's that I got recently.

So then, onto the pictures! first up, to the right, is a view of the Food Market as it is at the moment. The structure itself is more or less complete, but as the other photos below will show, the interior and a few more details have yet to be done. As usual, Zombie-Me is in the pics to illustrate the size of the build. This first pic, shows the sign that I created for the build. A clearer view of it is below (somewhere!)
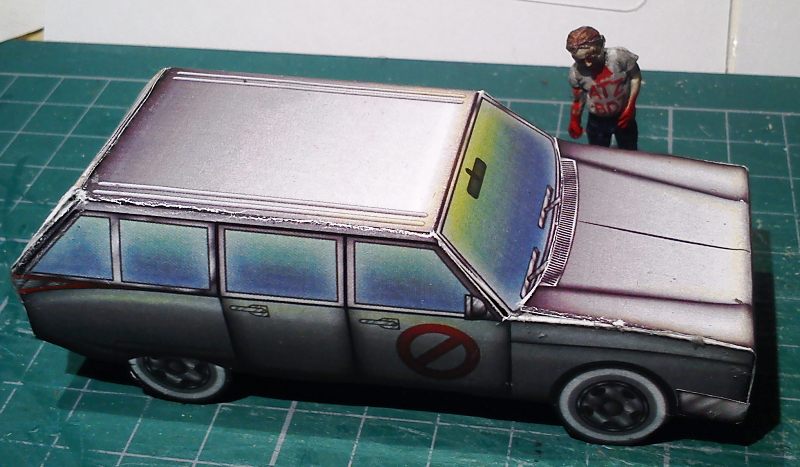
In the first pic, you saw the left and front of the build and this second pic shows the right side, with Zombie-Me on the roof. The roof that I've used is not the roof from the Food Market - this one comes from the M.U.C.K.  The roof in the Food Market has some stuff printed on it that I didn't want to use, so I opted for this one instead. Although I've 'glazed' the building, I haven't yet put the doors on ...
... as you can clearly see in this pic. Also, the fire escape needs adding - that's it next to the build in the pic to the right. Along with the fire escape will be a ladder that I've not done yet. I'll also add a ladder to the roof, so it can be accessed by combatants.
In this next pic, the roof has been removed showing the interior of the first floor. I was surprised that there would be a room with no windows, but I guess it's a storage room. I'm going to furnish the windowed room as an office, and try and fit a small toilet at the end of the corridor where the window is. I'm really not sure that there will be enough room though ...
The pic to the right shows the first floor after it's been removed along with Zombie-Me in the front room. Once more I've used 2mm thick card for the vertical walls, as it gives plenty of strength while being narrower than the exterior walls, as I think the interior walls should be. Although - IIRC - all of Stoelzel's Structures have this lift-out interior floor design, this is the first one that I've built in this manner. Unfortunately, I don't really like it, so my future builds will have stacking floors, each level having the exterior walls attached to the floor.
Onto the staircase. This is at the rear of the building and, as you can see in the pic to the left, is sandwiched between the exterior wall and an interior wall. It is quite narrow, and the 2 floor walls on each side make it quite difficult to get to.  However, as you can't actually see the stairs from the front, this did allow me to not bother with the vertical parts of the steps themselves.

Not having them present also enables a figure's base to be held in place on the stairs as you can see with Zombie-Me to the right. This is quite helpful, and I think I may use this again on future builds.
Onto the ground floor. The pic to the left shows how little furniture I've put together so far. In fact the shelf units that you can see are required to hold up the first floor, so they had to be there! The shelf units are actually double sided, but these ones are glued to the walls to keep the first floor in position. I do intend to make furniture, just not sure when ...
And here is a 'ground-level' view looking through the (absent!) front door. I think the shelving works pretty well and Carl's done a good job with them!


As promised way back at the start, here's a pic of the sign that I created for the shop. Hopefully some of you might recognise the name and the nature of the offered delivery service, but I don't think many from the far side of the pond will!
The model actually comes with a canopy for the front of the store and, although I made it (as you can see to the right), I decided not to attach it as a) I thought it would be a real pain to do as it had bowed :( and b) it would be a liability when storing the building.  I may revisit this at a later date though ....
That's it for the Food Market. In conclusion, it's a nice building that I'm glad I built - not that I've finished it yet!  If I were to build it again, I would certainly have made seperate floors, but that is my personal preference. When I originally built it, I didn't cut the windows out, but this made the ground floor interior so dark I felt I had to cut the windows out - which was a real pain when all the walls had been glued together!


Now then ... the Local Pub from Stoelzel's is next. I've not built it as yet, but I have made a start ... although that's only gluing the exteriors and main floor onto foamboard!  This pic to the left has the ground floor itself with exterior walls

This final pic of the pub shows its exterior upper floor walls
Here we have the main parts of the first building from Stoelzel's M.U.C.K that I intend to assemble. I'm not sure if I'm going to use the recessed entrance for it or not ....
Another M.U.C.K. building awaiting assembly ... although this one is about twice as deep as the first, it is narrower
And the last of the M.U.C.K. buildings I've assembled parts for; this will be quite a bit bigger than the other two.
And now onto Stoelzel's Storage Unit Buildings. I mentioned in my last post that renting some storage space for myself, gave me some ideas for this build. Unfortunately, I didn't realise how impractical they were until I'd actually started making it. To the left you can see the ground floor that I put together. That's an A1 sheet of black foamboard that I used for it, and none of the piece has actually been cut away ...  It was only once I had this done, and, as you can see, started on the walls, that I realised 2 things:
1. Where the hell would I store it?
2. What interest would a storage building of that size actually be in a game?

So since these pics were taken, I've revisited my plan and will now make the building (more-or-less!) the same size as Carl's design, although it will have 2 floors.
To the right is the modified main entrance that I put together for the building, complete with opening doors!
And to the left is the first floor that I started on before I came to my senses ... again this will be considerably smaller when finished.
And - at last! - the final group of photos in this post - the hospital beds from Grekwood. I got the mega-bundle of all the beds they do, and to the left is a group shot of them all after I'd finally got around to gluing the 'undercarriage' to the beds themselves.

I do have a question though ... these next 2 photos both have beds that have vertical panels at their sides. Of the 16 beds that I got, only these 2 have the panels.  Are they supposed to be like that? or is this flash of some sort?
 

So that's it for this post, not sure when I'll be able to post again ...