Long time no post, but I am still here!! Just not had the blogging mojo for months ...
Anyway, I've stumbled across something that I thought would be good to share, hence this post.
Until Salute this year, I've been buying plastic bases from various companies - mainly em4 miniatures who currently sell a bag of 10 30mm round, lipped bases for £1.02
While at Salute, I found the stand for The Troll Trader who were selling (IIRC) 15 of the same bases for £1
I now need some more of these bases - I'm rebasing most of my 28s on lipped bases so I can put a name on the figures - so I checked out Troll Trader's website. They sell a bag of 15 30mm round, lipped bases for £0.95 or a bag of 100 for £5.95!
So, I'll now be ordering my non-MDF bases from The Troll Trader and thought I'd share the info with you guys.
Showing posts with label Basing. Show all posts
Showing posts with label Basing. Show all posts
Wednesday, 27 May 2015
Tuesday, 10 September 2013
Not a city, but a building ...
 Well, I didn't get the 'cityscape' together last night, but I did get out one of the buildings I've made ... I also did a 'proof of concept' on the base finish I intend to use. You can see that on the smaller support base - as well as the top of the building - in the photo to the right. Also there is one of the police bases.

I got a lot more painting and first stage basing done last night and hope to get more done tonight, although there's no promise of an update as rapidly as this one appeared!
Thursday, 3 May 2012
A change in my basing method
Way back in this post :- how-i-base-my-figures, I described the process I have been using for years to base my wargaming miniatures for years.
As you can tell from that post, I've used DAS modelling clay, but have frequently read of other gamers' use of 'Terion' and other fillers, although I've not seen 'Polyfilla' referred to for some reason ... So when I was in one of the local 'cheap' shops a couple of weekends ago and saw a ready mixed pot for £1, I thought I'd get some and give it a go.
Well, I have to say that I'm very glad I did! It is much easier and quicker to use than the clay has ever been and I shall be using it from now on! I use an old knife to apply it in a 'trowel-like' fashion and have so far had excellent results with it.
For the spaceships I'm currently constructing, the adhesive qualities of the filler have proved a great boon. With the clay, I had to glue the multiple bases and washers (that I use to add weight to the base for stability) together and wait for them to dry. With the filler, I'm using a thin 'spread' between each 'layer' and that sticks them together superbly!

I've got no pics of it in use at present, although this pic (that I posted in my missing-pic-and-progress post) does show that the horse has filler on its base:
So I guess, if enough people tell you that their method is good - it's worth trying it yourself to see!
(Regarding the spacehsips, I spent last evening drilling them for the bases I'm making for them and hope to start gluing them together tonight. I'm even going to try a bit of soldering on one base! Hopefully I'll get some pics and post them soon.)
Friday, 19 August 2011
Altitude Bases 2
 A couple of days ago, I posted about buying some telescopic pick-up tools to try and make some altitude bases for my aeronef models. Ove the last couple of nigts I've been experimenting with this and thought I'd share some pictures. To the right you'll see the weight I used in some of the pictures below. It is a track piece for a 15mm T-35 from QRF. It must be about 10cm (4 inches) long and much heavier than any of my aeronef models. The small piece of magnetic sheet was easily enough to adhere strongly to the magnet on the end of the tool and I held it onto the track with a bit of sellotape.
 From my previous photos of aeronefs you'll remember (I hope!) that I used hex bases for them. I wanted to carry this forward to the new bases as they can be used for both turning and fire arcs. To the left you'll see my inital ideas. TBH I'd rather not use coins, but the cost vs weight is much better with them than anything else!

On the left is exactly the same thing, but with the telescopic part partially extended. What I did find, though, is when it is fully extended the stand feels very woobly and unsafe, although there is no evidence that it is - more of a perception than a fact I think ... but as they say, perception is everything!
Anyway, I decided to get some washers from B&Q to help and I think they have.

Here is the final version that I am putting together as the first base. It has 2 washers, 3 layers of pennies and 3 mdf bases - a 60mm square at the bottom, a 30x40 in the middle and a 40mm across flats at the top. The mdf bases give a real tight grip on the stand. I drilled 8mm holes in them and then forced the stand through; a tit fit, whereas the washers, with a 9mm hole in the centre were loose and shaky!

I grabbed this photo on my mobile phone this morning as I rushed out the door. It shows the stand, having glued overnight, with a toy plane from my local sainsbury's (for 74p) on top. I'm pleased so far!

Tuesday, 16 August 2011
Altitude Bases
Having seen the photos of the game put on at Salute this year by Arbuthnot's Aeronautical League of Gentlemen - I was there but somehow missed this game ... pooh :( - and the telescopic alititude stands they used I've been looking into this myself. I've read somewhere - but damned if I can remember where - that teh person who made them, bought TV digital aerials from a pound shop, getting 2 telescopic ...errr 'bits' in each pack.
Well, I've just been to the cheap shop on Addlestone high street and cleared their shelf of 'Telescopic Pick-Up Tools'. I reckon they are the same as the aerials, but already have a magnet on the end. So at 99p each they might be more expensive but come with a magnet attached! Here is the tool as purchased:

I was a bit concerned at how easy it would be to remove the clip and foam covering, but the clip was easily levered off and onve that was removed, it was obvious that the foam cover was only held in place by the clip and easily slid off. Disassembled pick-up and partially extended tool:

The tool has six sections, each about 92mm long. I think that I'll probably scratch a line about half-way along each section to give me more altitude bands. When I have an aeronef model on the end, One complete section will look too big, if you know what I mean.
So I now have 17 of these and the next step is to make them into suitable stands for my Aeronef games, and probably for all those 1/300 WW2 aircraft I have sitting in a draw somewhere.
As a reminder, this is now my aeronef models are currently based:

At the moment - this may change once I start experimenting - I intend to put some magnetic sheet on the bottom of the model to adhere to the telescopic stand and create something similar to the hex-base above for the bottom of the stand, although I imagine it will need to be bigger. For the above stand, the name plate is glued on, but for the new stands I'll use magnetic sheet on the nameplate and the base so the names can be changed as needed (I'll only have 16 [maybe 17 stands as I might actually keep one of the tools as is in my toolbox] and more aeronefs than that).
As it progresses I'll post further.
Monday, 1 August 2011
How I base my figures
I thought I'd start the new blog with a post about how I do the bases on my figures. To achieve a uniformity of size I ordinarily use 2p pieces for my 28mm figures, and have just started using 1p pieces for my 15mms. It seems strange (to me anyway!) but I've not found any washers or similar that I can use that are cheaper!
Anyway, gluing the mini's to the coins leaves an unsightly - to me - 'lip' so, many moons ago, I started using DAS modelling clay to hide this. Originally I could only find it in my FLGS but recently, since the FLGS changed hands, I found that you can get it in Rymans the stationers.
So, here is what I do; glue the figures to the coin:
Then I take a piece of the clay and press it down onto the coin to hide the lip and smooth it out using a knife:

As you can see in the above pic, overlapping the edge of the coin is not a problem at this stage - in fact you should slightly overlap it. That way, when the clay has dried (the time it takes can vary depending on the ambient temperature - on a hot day it can be as little as an hour, but I ordinarily leave it overnight) run a knife around the edge of the coin to clean up the edge:
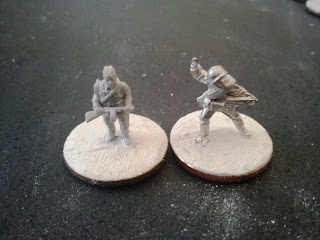
At this point the figure is ready for undercoating ... with these 15's I've been cleaning the flash - and mouldlines for the plastics - at this stage. I do the process in a 'mass-production' assembly line fashion:

I've also been using the clay to fill in the bottom of slotta-based figures for several years:

I find that this extra weight in the base gives the figure an added stability, as well as making it easier to stick magnetic sheet to the bottom. The figure in the above pic has also had the clay spread on top of the slotta-base to hide the slot and give a bit of texture.
Anyway, gluing the mini's to the coins leaves an unsightly - to me - 'lip' so, many moons ago, I started using DAS modelling clay to hide this. Originally I could only find it in my FLGS but recently, since the FLGS changed hands, I found that you can get it in Rymans the stationers.
 |
| DAS modelling clay |
 |
| 15mm Plastic Soldier Co Russian and QRF Russian |
Then I take a piece of the clay and press it down onto the coin to hide the lip and smooth it out using a knife:

As you can see in the above pic, overlapping the edge of the coin is not a problem at this stage - in fact you should slightly overlap it. That way, when the clay has dried (the time it takes can vary depending on the ambient temperature - on a hot day it can be as little as an hour, but I ordinarily leave it overnight) run a knife around the edge of the coin to clean up the edge:

At this point the figure is ready for undercoating ... with these 15's I've been cleaning the flash - and mouldlines for the plastics - at this stage. I do the process in a 'mass-production' assembly line fashion:

I've also been using the clay to fill in the bottom of slotta-based figures for several years:

I find that this extra weight in the base gives the figure an added stability, as well as making it easier to stick magnetic sheet to the bottom. The figure in the above pic has also had the clay spread on top of the slotta-base to hide the slot and give a bit of texture.
Subscribe to:
Posts (Atom)