Showing posts with label vehicles. Show all posts

Tuesday, 16 July 2013

BUSY!, Tankfest 2013 and First IHMN Game ...

To start with - apologies for the extended gap between posts ... it's been really damn busy at work ... I mean really busy ...

Anyway, in the gap since the last post (just over 3 weeks!) other things have been happening ...

On 29th June I took my dad to the 2013 Tankfest at the Bovington Tank Museum - a cracking day which I would recommend for anyone interested in AFVs. I took a few piccies that I'm going to share with you ...

First up is pic of something I'd not seen before; it's a WW1 vintage Lee-Enfield rifle with a side mounted sniper scope that one of the re-enactors had. I've only ever seen top-mounted scopes before, and this was very intriguing. The re-enactor also told me that the British scopes were the worst among the major combatants, with the Germans being the best ...


Next is the replica British MkIV WW1 tank that the museum had recently acquired (IIRC). Apparently it was made for the (relatively) recent film War Horse and then donated to the museum. Virtually hidden behind it, is the replica German A7V; that has been made out of wood and (IMO) is not really very convincing as a result. Still, I feel bound to say, that it's a damn sight better than I could have done, so kudos to the builders of it!
Although I didn't watch the arena displays - spending nearly all my time inside the museum - I did get this photo of the Mk IV trundling it's way around the arena - very impressive!
Then there was this vehicle (I can't remember waht it was though!). I took this pic, as I'd never seen the RAF roundel used as a recognition sign before ... IIRC it was used in Italy (& perhaps elsewhere).  If I ever get anywhere with WW2 figures, I may well use this on some of my vehicles, just to be a bit different!
Here we have a pic of an information board telling you how armoured trains were used in Britain during WW2. I knew that the Soviets and Nazis used armoured trains, but was unaware they had been used in the UK. I took this to remind me - and to keep the info in it - as a possible addition to my 15mm VBCW project (if it ever progresses beyond the undercoated figure stage!). I thought some of you might find it interesting as well (yes you Clint!).
Finally there are two more pics, both for VBCW. First is the information board to the left describing how in 1940 (at the height of the possible invasion period) trucks were armoured with concrete to try and fill the AFV deficiency. Apparently they were so heavy that they were more (slightly!) mobile pillboxes than 'tanks'.
And to the right is a recreation of the vehicle described in the board. I took this for the camouflage pattern and colours, as I plan to try and make (at least) one of these for VBCW (perhaps sponsored by "Jones' Butchers")
My next post will be an AAR of my first game of IHMN which was on 28th June. It featured my company - Her Majesty's Martian Constabulary:
against Andy's "Blue Tortoise Tong":

More on that next time! (which should be less than 3 weeks ... )

In other news:
  • My second game of IHMN is arranged for this coming Friday, and I intend to use a different company -probably "Professor Mek-a'nik and his Metallic Minions", but that may change
  • I've been making slow progress on my Martian terrain; more on that after the upcoming AAR (or two!)

Wednesday, 20 March 2013

1st Light -WIP 1

I mentioned in my last post that I've been working on WWG's First Light spaceship and thought I'd share with you the progress I've made so far.

The basic construction method of the model is to make the rooms and corridors as a series of boxes which can then be assembled how you wish.  There are bits to add or remove doors to the rooms and there are quite a few different rooms supplied - including cargo bay, airlock, bridge, turret and so on ...

In the pic below, the two big rooms at the top are cargo bays, with an airlock in between; a long corridor leads from the airlock which has 2 smaller corridors branching off and there are 4 other rooms at the bottom of the pic (which is going to be the front of the ship, btw)

Below is a close up of the exterior of the airlock (with Zombie-ME for scale as usual), which the only room that I've done a roof and any of the exterior for so far. There is a roof for each room - the intention being that you can reveal parts of the ship as they are reached - as well as exteriors

The doors in the kit are designed to be removed as needed, and the pic below shows the exterior airlock door partially removed showing Zombie-Me's base

I'm making the model with mounting board for the floors, 2 bits for the walls (so the doors can be sandwiched in between) and foamboard for the roofs.

I don't have a particular game in mind for this model (other than some kind of Space Hulk thing) but I've had it for ages and wanted to build it all that time, so I've finally started it!

Wednesday, 6 February 2013

Stoelzel's Structures Vehicles

As promised in my last post, this one will go into more detail about the vehicles I have been making from Stoelzel's Structures. As I said before, all but the RV are from the Auto Park Playset, and the RV is from Trailer Town Playset, both of which are excellent sets BTW.

Before I share pics of the models, I thought I'd share the process behind making them with you.  As I print my models on a colour laser printer, which AFAIK, will not print onto card (and I'm not able to do so, even if it could), the first stage of all my builds is to cut them out from the A4 sheet. 

Then I glue them onto thin card using a glue stick, before cutting them out (again) from the card sheet. Note that the tabs on the model should NOT be glued to the card. I've tried this, and while it does give stronger tabs, the card makes it very, very difficult to get a tight enough crease on the tab.

The next step is the bottom of the model. Back in my post ebbles-card-vehicles, I mentioned that I added a piece of 2mm thick card (aka mounting board) to the model to give it added weight and stability. With these models, I've evolved that a step further by adding a piece of foamcore on top of the piece of card. This doesn't noticeably add to the weight, but it does give the bottom edge of the sides something they can be stuck to as well as allowing you to squeeze them together as the glue takes hold. Also the tabs on the bottom edge of the sides can be glued to the card instead of trying to glue the bottom of the model onto tabs that you can't get to. The underside part of the model is then glued onto the card.

This method is especially easy with the Stoelzel's models as the underside is a seperate piece - thanks for that Carl!

And finally the wheels ... these have been a real pain. I developed a process for these when making the Ebbles models referred to earlier. What I do is to take the print of the wheel, cut off the piece that wraps around the wheel so you just have the tyre's side image and stick that to foamcore. I then cut this out with my knife - never yet having achieved a round cut-out - and then glue the bit that forms the outside edge of the tyre to the foamcore. All that remains is to edge it with black marker. I found the little triangles that are supposed to glue under the tyre's edge far too fiddly - they stuck to my fingers more often than the tyre :(

So that's how I make them, and now onto the pics of the models I've made so far. 

First is the estate

Then we have the Luton van. Although this looks very fiddly when printed, it was easier to put together than I had feared. These pics show quite clearly that I used the wrong shade of red when edging it :( I will have to find a darker shade.
 

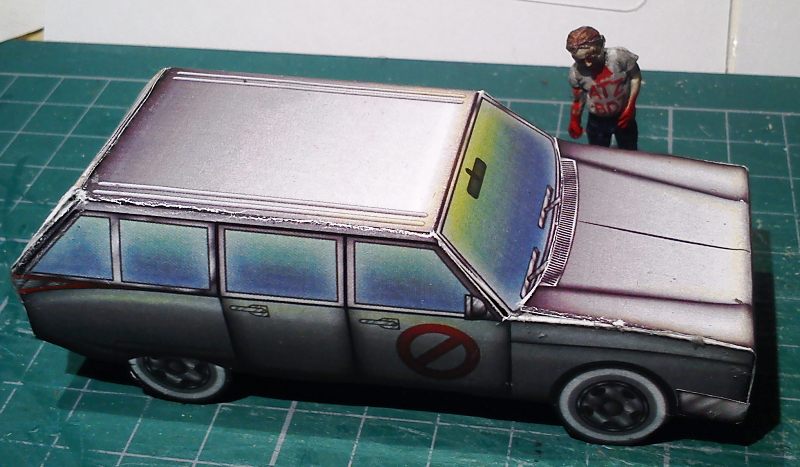
Now the ... I'm not sure what it is actually; is it another estate? or a hearse? perhaps Carl can tell me. Whatever, it is a nice model, although you can clearly see that I have yet to edge it. This clearly shows on the bonnet edge in the second pic

The green sedan arrives next. As with all the models in the Auto Park Playset this comes in multiple colours and I can see that I'll be making quite a few of these

And the same with the next model - the SUV

And finally the RV. As you can see this is a big model.

What I found with the RV, and the body of the Luton is that the sides are long enough to bow inwards once assembled. This meant that I had to carefully slice the RV open and insert a brace (scrap foamcore) to keep the sides pushed out. Having discovered this with the RV, I braced the van as I was assembling it, obviating the need to cut it open. Even with the brace, the sides of the RV are still slightly concave as I hope you can see in the pic below where I rested a flat piece of foamcore on the side of the RV.
This 'concavity' doesn't really show in the finished model - you can't see it in the 2 pics of the RV above and they were taken after the opening & bracing, but the strange thing is, that you can really feel it when you pick the model up ...

Anyway, if you make these models - i.e. RV & Luton - then put a brace in.

I'm not sure if it comes across in this post, so I'll specifically state it here; I enjoyed making these models, and the "trial of my patience" that I mentioned in my last post  because of the steps I outlined above and not because of the models themselves!

Next time ... the car park


Friday, 1 February 2013

Zombie Blog, MDF Boards and Cardboard Vehicles

As you might have guessed from this post's title, I've got a few things to post about today ...

First is a zombie blog that I've just discovered as its author has joined the rather friendly forum - Board of the Living Lead, which I heartily recommend to all.

The first post of this blog / journal is at this link and I, for one, will be following it and trying to catch up!

Second. With the release of Stoelzel's Structures' Undeveloped Real Estate, I decided to use the roads in that pack to create some terrain boards.  So I surfed the net for a while looking for some thin MDF to use as the base.  I found Hobarts Lasers 3mm MDF and ordered a 15 of the 300x600 sheets to begin with. I had been planning to glue some of the 2mm mounting board that I use for buildings to the MDF to give it some texture, but when it arrived I decided to try just gluing the prints straight to the board.

Unfortunately, this was a mistook, as the boards warped :( . So now I've tried the card on the board and have left them under a weight to allow the glue to set with the boards compressed flat. I haven't removed the weights since Wednesday night and will check them tomorrow probably, so fingers crossed!

And finally, number 3. The card vehicles I've been making. All but one, IIRC, are from the Stoelzel's Structures' Auto Park Playset, the RV is from Stoelzel's Structures' Trailer Town Playset.

I had intended to take some decent photos of them last night, but time got away from me, so grabbed some quick photos this morning on the way out. So, here they are.

First up is a group shot, with (from left to right) the sedan, the not-ghostbuster hearse (?), station wagon estate, SUV, RV and luton van (not finished yet)

Next is a closer shot of the Sedan, with Zed-Me for size indication

A slightly blurry pic next

And finally, the rather big RV

It's been a trial of my patience putting these together, and I'll go into what I did in more detail in a future post

Tuesday, 9 October 2012

Ebbles Card Vehicles

After seeing Ironmonk's post on his card vehicles here:  paper-people-movers, as I said in my last post, I was inspired to take pics of the Ebbles trucks I've made - and I actually did it!

So here they are; first up is a group shot of the three I've made, with Zombie-Me on top to give an idea of size; also, IIRC, the grid on the cutting mat is made up of centimetre squares
l-r: Water Tanker, Covered Body, Fuel Tanker
The trucks come in a set,  which has the 3 bodies shown in the picture above, plus an open flat bed that I've not made yet. You can get them from here at Genet Models' shop. (Genet Models is the new name for Ebbles).

Now for some individual shots of the trucks. I made the Water tanker a while ago, which is why it's white and the others Grey. There are another two colour schemes in the set: Helo Drab (dull green) and Tan (pale greeny-brown (on my monitor anyway!)).
White Water Tanker
 Next is the covered body version. I like this a lot and intend to build at least one more
Grey Covered Body
Finally for the trucks is the Fuel Tanker. Unlike the water tanker, I made this by scoring the interior of the body so that instead of being curved its sides are angled straights.  I think it looks better and it was easier to assemble than trying to bend the sides.
Grey fuel Tanker
As a note on the trucks, I put a piece of 2mm card in the base of the chassis when I assembled them - well the two grey ones anyway. This has made them substantially heaver than the white truck and they feel 'more solid' as well. I also think they'll be less likely to get knocked around on the table when used. I'll certainly be doing this with other card vehicles I make, as well as using Ironmonk's tip of dowelling for the wheels, which will add more to their weight!

And finally for this post, the M11 police vehicles. The pic shows the M11 copcar as supplied on the left and a K9 unit version that I bashed from it. I'm very pleased with how it came out.
M11 Cop-cars
 So much so that here's a close-up of it!

I enjoy making these card vehicles, and have decided that I'm only going to use card vehicles. This means that once I get into my new place (and find everything again!), I'll be running a giveaway of the diecast vehicles I've got through this blog - but not today!

Tuesday, 24 July 2012

Quick Update

Unfortunately, nothing substantive today. Just a post to let you all know I'm still here and working away on card and foamcore models.

As an indicator of what I'm upto, here is the Stolezel's Structures die-roller that is included with the Modular Urban Construction Kit (aka M.U.C.K.) that I built a while ago. I will do a post on it with more pics soon:


Last for this post is the model that I finished last night. It's a lorry from the Genet Models Convoy set, although when I bought it, the company was called "Ebbles Miniatures". This one has the fuel tanker body. I made a water tanker (in white) a long time ago, and I'm going to make a couple of the closed and open body versions (all in grey) to make a convoy/lorry-park as scenery for games. Just as a note, rather than score the folds necessary to create the tank shape, I used a ballpoint pen (pressing down hard) and I do like the way that's come out.
The set includes 15mm versions of the trucks, has 4 bodies (water tank, fuel tank, open bed and closed bed), each of which is in 4 colours - grey, white, tan and 'helo drab' The colour on the product page linked above).  Very nice models and worth the $5 the set costs (atm!)

Monday, 28 November 2011

A Church, 2 Cars, a Pile of Crates and a Magazine ...

In my recent post "Time ... where does it go??", I was wittering on about some of the model buildings I've been constructing lately. Well, one that I've just finished (well ... nearly anyway!) is the Dave Graffam Models' Village Chapel. As with most of their models it has multiple 'layers' in the pdf file which means you can get a variety of finishes. I went for the 'medieval stone' with 'blue tiles' for the roof, with the optional annex and the foyer ... and here it is in all its glory:
with a 28mm Copplestone mini (IIRC) to give a size reference
And here it is again showing the entire steeple, which I have left removeable to aid in storage:
The same mini is to the left of the annex
What you don't get in the file though, is any interior detailing. I've used the file to come up with my own. In the pic below, you can see the interior of the church. The wall at the top has had the exterior wall with no textures, but the same windows as the exterior I've used glued to the inside. I've also used one of the floor textures from the Low Ruins set as tiling for the floor. At this, though, I gave up as I wasn't at all sure how to do the rest ...

And here is a shot of the interior of the foyer ... without opening doors I probably shouldn't have bothered with this as it's damn hard to get your hand in there!

Here's a slightly blurry pic of the models I've put together on their shelf. At the left side is the church with the steeple removed and stored inside the main building. On the right are the two Low Ruins I've put together so far:

At the end of my last post - Warfare Convention and other stuff ... - I had pics of a couple of self-assembly diecast cars I'd bought. Well, they took about a minute to put together - if that! - and they've turned out quite nicely ... here's a shot of the Hummer

And another lower-angle shot to better see the size

The second model was a land-rover and that's turned out just as well

Making these buildings has left a lot of little off-cuts from the board I am using ... I was keeping most of them as I thought "they'll come in handy" for something! Then I had a brainwave and found a pdf  file that I had downloaded a long time ago from http://www.toposolitario.com/ a Spanish modeller's site with quite a few free downloads. Naturally, it is in Spanish, but the photos explain very well and the author has provided an English translation for those - like me - who are linguistically challenged. I couldn't find the page that I got the file from, but Google showed me that it is still here. Anyway, it has a bunch of crates, and I've printed it out and am working my way through a heap of the crates that I'll use to populate my Multi-Story [sic] Warehouse when I build it. So here they are:
And another view:

And finally for today, I was in my local branch of Smiths on Sunday morning when I saw this magazine:
I'd never seen or even heard of it before and intrigued, I bought it. It's written in the Netherlands and published in English and first impressions are very good. Have any of you guys seen this before?